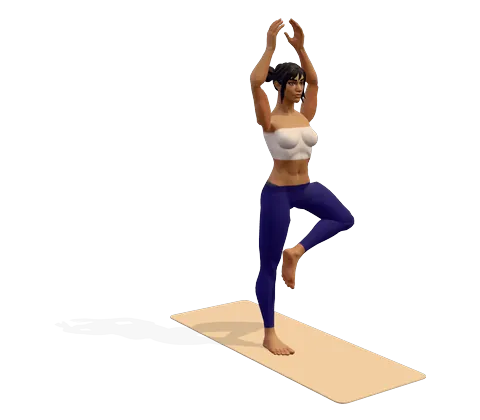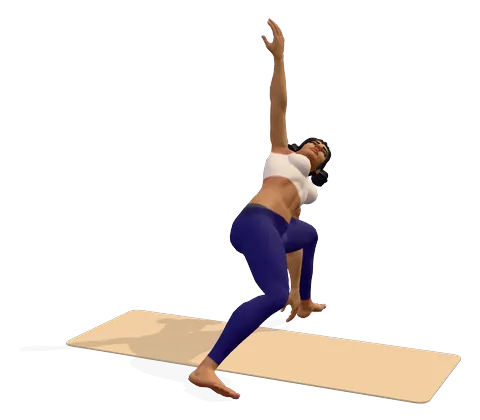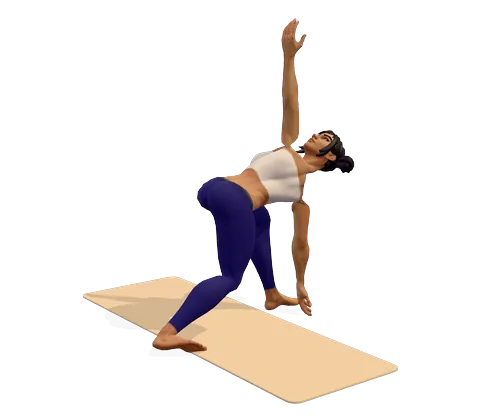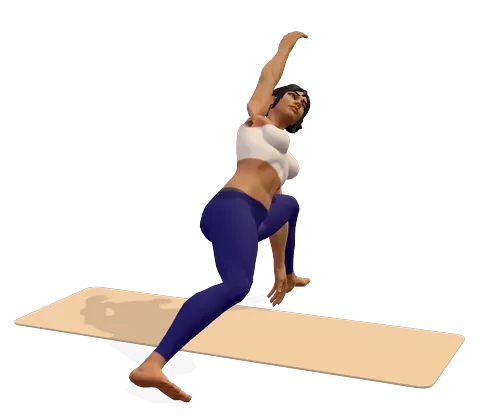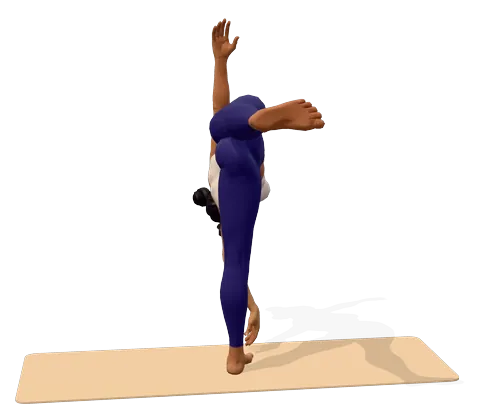
How to do Half Moon Pose step by step
- Start in Triangle pose on the left side, or stand with your feet wide and your left toes turned to the left. Bend your left knee a little.
- Look down and place your left fingertips (or a block) on the floor about 30 cm ahead of your left foot and slightly to the little-toe side.
- Shift your weight onto your left foot. Breathing in, straighten your left leg as your right leg lifts off the floor, until it is level with your hip.
- Flex your right foot so the toes point forward, not down. Stack your right hip on top of your left hip.
- Reach your right arm straight up so both arms form one line. Open your chest to the front and look straight ahead, or up at your right hand if you feel steady.
- Hold for 15–30 seconds (3–5 breaths), pressing evenly through the standing foot.
- To come out, look down, bend your left knee and lower your right leg back to the floor with control. Rise to standing and repeat on the right side.
Where you feel Half Moon Pose: what it stretches and strengthens
Stack your top hip over the bottom one and reach long through both legs. In the 3D guide, turn on Body guide: areas that stretch glow green and areas that work glow saffron.
Stretches
- Hamstrings
- Inner thighs
- Chest
Strengthens
- Glutes
- Ankles
- Side waist
Benefits and precautions
Benefits
- Builds balance and ankle stability on the standing leg
- Strengthens the glutes and outer hip of the standing leg and the lifted leg
- Stretches the hamstrings and inner thighs of the standing leg
- Opens the chest and the front of the shoulders
- Works the obliques and deep core to hold the body sideways
- Trains focus, because you cannot hold it with a busy mind
Avoid or modify if
- Low blood pressure, vertigo or dizziness — practise with your back against a wall and look down, not up
- Poor balance or a fall risk — keep a wall or chair close and use a block under the hand
- Ankle, knee or hip injury on the standing leg — skip it or do the wall version with the lifted leg lower
- Neck pain — keep your head in line with the spine and look at the floor or straight ahead
- Hamstring tear — keep the standing knee slightly bent and the hand on a high block
- Pregnancy — only with a wall behind you and a block, and only if you already practise it; ask your midwife or doctor first
Half moon pose (Ardha Chandrasana) is a standing balance in which you stand on one leg, reach one hand to the floor and lift the other leg and arm, so your body makes a flat shape facing forward. It asks for strength, flexibility and balance at the same time, which makes it a favourite in flow classes and a good test of your standing poses. This page explains how to get into half moon pose safely, the cues that help, what it is good for and how to change it if it feels too hard.
What is half moon pose?
Ardha Chandrasana is a level-two standing pose. The standing leg and the lower hand support your weight, while the top leg lifts level with the hip and the top arm reaches up. From the side, the body looks like a half circle or a crescent, which is why some teachers call it half crescent moon yoga pose. In Ardha Chandrasana yoga classes it usually comes after Triangle pose.
Half moon pose Sanskrit name and meaning
The Sanskrit name breaks down simply: ardha means "half", chandra means "moon" and asana means "pose". Why is it called half moon pose? Two explanations are common: the arms and legs trace the outline of a half moon, and in yoga texts the moon stands for calm, cooling energy, which balances the "sun" energy of more heating poses. That same idea gives its name to Chandra Bhedana pranayama, left-nostril breathing; Chandra Bhedana pranayama benefits are said to include a calmer, cooler body.
In Bikram and some hot yoga classes, "half moon pose" means something different: a standing side bend with the arms overhead and palms together. On this site that side bend is the lateral arc pose.
How to do half moon pose step by step
The steps above follow the 3D guide, left side first. The easiest way to get into half moon pose is from Triangle pose: bend the front knee, walk the lower hand forward, then lift the back leg as the front leg straightens. Think of it as a see-saw, where the leg rises as the torso tips forward.
Half moon pose cues that help
- Hand ahead of the foot, not beside it. Place the hand about 30 cm forward and slightly outside the little toe. Under the shoulder is the goal.
- Lift the leg to hip height, no higher. A leg that is too high twists the pelvis toward the floor.
- Flex the lifted foot. Toes point forward and the heel pushes back, as if you were standing on a wall.
- Soft, strong standing knee. Straight but not locked; lift the kneecap by firming the thigh.
- Turn the chest, not only the arm. Roll the top ribs open from the waist.
- Look at the floor first. Only turn your head up once the balance is steady.
Half moon yoga pose benefits
The main benefits of half moon pose come from balancing on one straight leg while the body is horizontal. The standing ankle, knee and hip make hundreds of small corrections, which builds stability that carries over to walking, running and other balance poses. The glutes of both legs work hard: the standing side holds the pelvis level, the lifted side holds the leg up.
At the same time the hamstrings and inner thigh of the standing leg get a long stretch, and the chest and shoulders open. Many people also notice that this standing half moon pose calms the mind, because it needs full attention. These standing half moon pose benefits build up over weeks of regular practice. Balance work is useful at every age, and a supported version is part of our yoga for balance in seniors plan.
Muscles stretched and worked
| Stretched | Strengthened |
|---|---|
| Hamstrings of the standing leg | Glutes and outer hip of both legs |
| Inner thighs (adductors) and groin | Ankle and foot of the standing leg |
| Chest and front of the shoulders | Obliques and deep core, holding the torso sideways |
Half moon yoga pose for beginners and modifications
Most half moon pose modifications solve one of two problems: the hand cannot reach the floor, or the balance keeps failing. These half moon pose variations for beginners fix both.
- Half moon yoga block: put a block under your hand on its tallest height. It raises the floor so your spine stays long. Two half moon yoga blocks, one under the hand and one close by, also work.
- Back against a wall: stand with your back and the lifted heel lightly touching a wall. You feel whether your hips are stacked, and you cannot fall backwards.
- Foot on the wall: face away from a wall and press the lifted foot into it at hip height.
- Top hand on the hip: keeps the pose simpler while you learn the balance.
- Half moon pose kneeling: some teachers use a kneeling version from the knees with one leg stretched out to the side. It gives the side stretch without the balance.
Ardha Chandrasana prep poses and warm up poses for half moon
Good half moon pose prep includes Mountain pose, Tree pose for single-leg balance, Triangle and Extended Side Angle for the hip and side body, and a standing forward bend for the hamstrings.
Advanced variations
- Half moon pose with bind (Baddha Ardha Chandrasana): the top hand reaches back to hold the lifted foot behind you, which adds a quad stretch.
- Ardha Chandra Chapasana (sugarcane pose): bend the top knee and hold the foot with the top hand, then kick the foot into the hand to make a backbend.
- Hands free: lift the lower hand a few centimetres off the floor to test pure leg strength.
Half moon pose vs revolved half moon
In Parivrtta Ardha Chandrasana, also called the twisted half moon, the hips face the floor and the opposite hand comes down while the chest twists open. It is harder: the base is narrower and the twist makes balance less stable. Learn the open version first. The benefits of the revolved version lean more toward spinal rotation and core strength, and revolved half moon pose yoga classes usually teach it after the open form.
A simple half moon sequence and transitions
A classic half moon sequence yoga teachers use is Warrior II, then Triangle, then half moon, then back to Triangle and a wide-legged forward bend. Common half moon pose transitions also include moving from Warrior III by opening the hips to the side, or from half moon into revolved half moon. Practise the pose inside a sequence with the sequence builder or in our voice-guided Balance and Focus session.
Who should avoid half moon pose
Skip or modify the pose if you have the issues in the caution list: dizziness or low blood pressure, balance problems, injury to the standing ankle, knee or hip, a torn hamstring or neck pain. In pregnancy, only practise it with a wall behind you if you already know the pose, and ask your midwife or doctor. If your standing knee or hip hurts, stop and rest in a standing forward bend.
Frequently asked questions
How do I get into half moon pose without falling?
Look at the floor, put a block under your hand and practise with your back near a wall. Lift the back leg slowly as the front leg straightens, and keep the standing knee soft.
How long should I hold half moon pose?
Hold for 15–30 seconds (3–5 breaths) on each side. Come out while you still have control rather than falling out.
Where should my hand go in half moon pose?
About 30 cm ahead of the standing foot and slightly to the little-toe side, so the hand ends up under the shoulder. Use a block if the floor feels too far.
What are the main benefits of half moon pose?
It builds balance and ankle stability, strengthens the glutes and core, stretches the hamstrings and inner thighs, and opens the chest.
Is half moon pose good for beginners?
It is a level-two pose. Beginners can learn it safely with a block and a wall once they are comfortable in Triangle and Tree pose.
Why do I feel half moon pose in my standing knee?
The knee may be locked or the weight may sit in the heel. Keep a micro-bend, spread the toes and press through the whole foot.
What is the difference between half moon and Bikram half moon?
Ardha Chandrasana in most styles is the one-leg balance shown here. Bikram and some hot yoga classes use the name for a standing side bend with arms overhead.
This page is for general education. Check with your doctor before starting yoga if you are pregnant, have a medical condition or an injury. Stop if you feel pain, dizziness or shortness of breath.